Medical Disclaimer: This article is for informational and educational purposes only. It does not constitute medical advice. Blood glucose testing goals, target ranges, and medication adjustments should be established and supervised by your healthcare provider. Always follow your doctor's specific instructions for testing frequency, timing, and responding to results.
How to Use a Blood Glucose Meter: Step-by-Step Guide for Accurate Results
Why Accurate Testing Matters
For the more than 37 million Americans living with diabetes, blood glucose monitoring is not optional — it's the feedback mechanism that drives every other management decision. The number on your meter tells you whether your last meal, your exercise routine, your medication timing, or your stress level moved your blood sugar in the right or wrong direction. Without accurate readings, that feedback loop breaks down.
Yet studies consistently show that a significant proportion of home glucose readings are inaccurate, often due to preventable technique errors: inadequate blood drop size, contamination on the finger, expired test strips, incorrect meter coding, or improper timing. A meter that's 20% off doesn't just give you a wrong number — it causes decisions that move in the wrong direction.
The good news is that accurate home glucose monitoring is entirely achievable with proper technique. This guide covers everything from equipment selection to step-by-step testing procedure, common errors, and understanding your results.
Understanding the Equipment
The Glucose Meter
A blood glucose meter (also called a glucometer) is a small electronic device that measures the concentration of glucose in a blood sample. Modern meters use electrochemical analysis: a test strip containing glucose oxidase enzyme reacts with glucose in the blood sample to produce an electrical current proportional to the glucose concentration. The meter reads this current and displays a glucose value, typically in milligrams per deciliter (mg/dL) in the US, or millimoles per liter (mmol/L) in other countries.
FDA-cleared home glucose meters must meet accuracy standards set under the ISO 15197:2013 standard: 95% of results must fall within ±15 mg/dL (for readings below 100 mg/dL) or within ±15% (for readings 100 mg/dL and above) compared to a laboratory reference. In practice, quality meters from established brands typically perform better than the minimum standard, but accuracy still depends heavily on technique and strip quality.
Test Strips
Test strips are single-use reagent strips that contain the enzymes and chemicals that react with your blood sample. Each strip has a small sample zone (the colored tip) and contact terminals that connect with the meter. Test strips are brand- and meter-specific — you cannot use strips from one brand in another brand's meter (each manufacturer calibrates to their own strip chemistry).
Test strips have expiration dates for a reason: the enzymes degrade over time, leading to inaccurate results. Using expired strips is one of the most common causes of inexplicably abnormal readings. Always check the expiration date before testing.
The Lancing Device
A lancing device is a spring-loaded pen that holds a lancet (a tiny needle) and controls the depth of the fingerstick. Most lancing devices have adjustable depth settings (typically 1–7, with higher numbers for thicker skin or deeper penetration) and a disposable cap to prevent contamination. Lancets should be used once and replaced — used lancets become dull and cause more discomfort, and reuse carries infection risk.
Control Solution
Control solution is a glucose solution at a known concentration that you can test like a blood sample to verify your meter and strips are functioning correctly. Most meter manufacturers provide control solution specific to their meter. Testing with control solution and verifying the result falls within the acceptable range (printed on the strip container) confirms your equipment is working accurately. You should use control solution when you open a new vial of test strips, suspect your meter may be giving inaccurate results, and periodically (at least monthly) as a quality check.
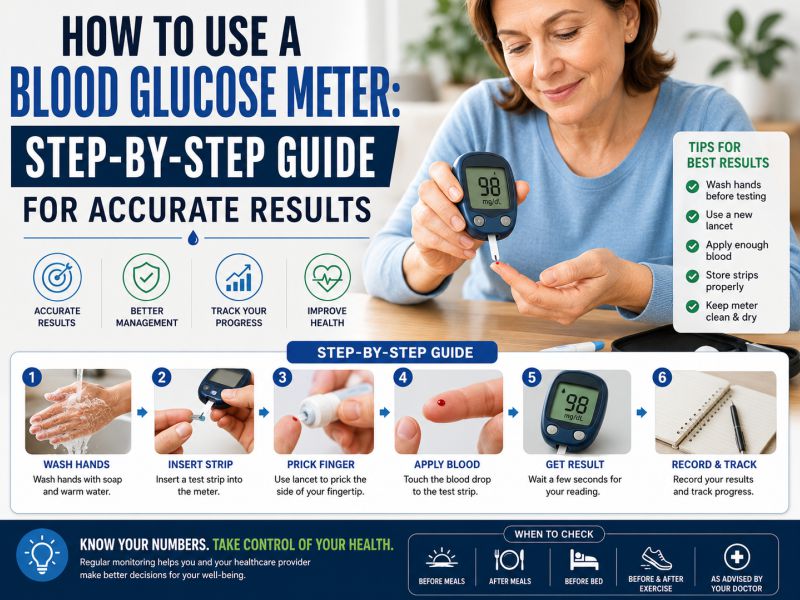
Step-by-Step: How to Test Your Blood Sugar
Step 1 — Gather Your Supplies
Before starting, collect everything you need: your meter, a test strip, your lancing device loaded with a new lancet, an alcohol swab or clean water and a clean cloth, and a sharps container or safe lancet disposal method. Having everything within reach before you begin prevents interruptions during the procedure.
Step 2 — Wash and Dry Your Hands
Wash your hands thoroughly with warm soap and water for at least 20 seconds. Dry completely. This is the single most important preparation step for accurate testing. Residual food, juice, lotion, or other substances on your fingers can produce falsely elevated glucose readings — even trace amounts of fruit juice or sugar can add 50–100 mg/dL to your reading.
On alcohol swabs: Alcohol swabs are appropriate for cleaning the finger before testing, but you must allow the alcohol to dry completely before lancing. Testing through wet alcohol can dilute the blood sample and affect accuracy. Warm water and soap is generally preferable to alcohol for routine testing; reserve alcohol for situations where soap and water aren't available.
Step 3 — Prepare Your Lancing Device
Insert a new lancet into the lancing device, remove the protective cap from the lancet tip, and replace the lancing device cap. Set the depth dial to the appropriate setting for your finger — start at a lower setting and increase if you're not getting an adequate blood drop. Most adults find depth settings 2–4 work for fingertip testing; thicker skin may require 5–6.
Step 4 — Turn On the Meter and Insert a Test Strip
Most modern meters turn on automatically when you insert a test strip. Insert the strip into the meter's strip port in the correct orientation (most strips only insert one way). The meter will display a readiness symbol (often a flashing blood droplet icon) when it's ready to receive a blood sample. Note: some older meters require manual coding to match the strip calibration lot — check your meter's manual if a code number appears on your strip container.
Step 5 — Lance Your Finger
Select a testing site on the side of a fingertip — not the pad directly on the fingerprint, which has more nerve endings and causes more discomfort. Alternate fingers and sides of fingers across tests to allow healing and prevent callus formation at a single site. Press the lancing device firmly against the side of your fingertip and release the trigger.
To encourage blood flow: Warm your hands before testing (cold fingers produce smaller blood drops), let your arm hang down briefly before lancing (gravity assists blood flow), and gently massage from the palm downward toward the fingertip before pressing the lancing device. Do not squeeze excessively after lancing — forceful squeezing can dilute the blood with interstitial fluid, affecting accuracy.
Step 6 — Apply Blood to the Test Strip
Touch the blood droplet to the sample zone at the tip of the test strip — do not smear or wipe, just touch the strip to the blood and allow the strip to wick the sample in. Most modern test strips require a small sample (0.5–1.5 microliters) and will fill by capillary action. The meter will beep or signal when it has received a sufficient sample. If the sample is insufficient, the meter will display an error message — do not add more blood to the same strip; discard and start again with a fresh strip.
Step 7 — Read and Record Your Result
The meter will display your glucose reading within 5–10 seconds. Record the reading along with the date, time, and relevant context (before or after a meal, fasting, post-exercise, how you were feeling). Most meters have memory that stores recent readings, and many modern meters connect to smartphone apps for automatic logging — but a written or app-based log with context notes is invaluable for pattern recognition and conversations with your healthcare team.
Step 8 — Dispose of the Lancet Safely
Lancets are sharp medical waste. Recap the lancing device (not the lancet itself) and deposit used lancets in a dedicated sharps container. Never place loose lancets in household recycling or trash where they could injure waste handlers. When your sharps container is full, follow your local health department's guidelines for sharps disposal — many pharmacies and community health centers accept sharps for proper disposal.
Testing Sites: Fingertip vs. Alternate Sites
Fingertip testing is the standard because fingertip blood most closely reflects current blood glucose levels — changes in blood sugar appear in fingertip capillaries within a few minutes. Some meters are cleared for alternate site testing (forearm, palm, thigh), which causes less discomfort. However, alternate site readings may lag behind fingertip readings by 20–30 minutes during periods of rapidly changing blood sugar — such as after meals, during exercise, or when experiencing hypoglycemia.
Do not use alternate sites for: Testing when you suspect low blood sugar (hypoglycemia), after meals (when blood sugar is changing rapidly), after exercise, or during illness. Use fingertip testing in these circumstances for the most accurate and timely readings.
Testing Schedule: When to Check Your Blood Sugar
Your testing frequency and schedule should be established by your healthcare provider based on your diabetes type, medication, and management goals. Common testing patterns include:
Fasting blood sugar (before breakfast): Tested first thing in the morning before eating or drinking anything. Reflects overnight blood sugar control and the effect of any overnight medications or basal insulin.
Pre-meal (preprandial): Tested just before eating. Establishes the baseline before a meal and helps determine mealtime insulin doses for those who calculate meal-based doses.
Post-meal (postprandial): Typically tested 1–2 hours after the start of a meal. Shows how a specific meal affected blood sugar and helps identify foods that cause problematic spikes.
Bedtime: Helps ensure blood sugar is at a safe level before sleep and that overnight medications are appropriately dosed.
As needed: When experiencing symptoms of hypoglycemia (shakiness, sweating, confusion, rapid heartbeat) or hyperglycemia (extreme thirst, frequent urination, fatigue, blurred vision), before driving, before and after exercise, and during illness.
Understanding Your Blood Glucose Numbers
Blood glucose targets are individualized and should be set by your healthcare provider. That said, general reference ranges used in clinical practice provide context:
| Test Timing | Normal (Non-Diabetic) | ADA Target (Most Diabetics) |
|---|---|---|
| Fasting / Before meals | 70–99 mg/dL | 80–130 mg/dL |
| 2 hours after meals | Less than 140 mg/dL | Less than 180 mg/dL |
| Bedtime | — | 100–140 mg/dL (general guidance) |
| Hypoglycemia (low) | Below 70 mg/dL | Below 70 mg/dL — requires treatment |
Important: These are general reference ranges. Your individual targets may differ based on your age, how long you've had diabetes, other health conditions, and your medication regimen. Always use targets established by your care team rather than general reference values.
Common Errors That Cause Inaccurate Readings
Contaminated fingers: The most common error. Food residue, lotion, or even trace amounts of juice on the fingertip can dramatically elevate readings. Washing and drying thoroughly before every test is non-negotiable.
Expired test strips: Enzyme degradation in expired strips causes results to drift — most commonly lower than actual (the enzyme activity decreases, registering less glucose than is present). Always check the expiration date, and discard strips from a vial that's been open for more than 3 months (check your brand's guidance — some specify shorter open-vial validity periods).
Insufficient blood sample: An under-filled strip produces an error code on most meters. Some older meters may give a low result rather than an error when the sample is inadequate. Always wait for the meter's confirmation signal that the sample is sufficient.
Excessive finger squeezing: Forcefully milking the finger dilutes the blood sample with interstitial fluid, which has a lower glucose concentration than capillary blood. This artificially lowers the reading. Use gentle pressure and encourage blood flow with hand warming and gravity rather than forceful squeezing.
Temperature extremes: Most meters operate accurately between 59°F and 104°F (15°C–40°C). Using a meter in a very cold environment (like a car in winter) can produce inaccurate results. Warm the meter to room temperature before testing.
Storing strips improperly: Test strips are sensitive to humidity and heat. Keep them in the original container with the cap tightly closed. Do not store them in the bathroom (humidity), car (heat), or refrigerator (condensation when opened). Optimal storage is a cool, dry location at room temperature.
Low battery: A weak battery can affect the accuracy of meter readings. Many meters display a low battery indicator — replace the battery promptly when it appears rather than continuing to test.
Choosing a Blood Glucose Meter
The right meter depends on your specific needs and lifestyle:
Accuracy class: Look for meters that publish accuracy data meeting or exceeding ISO 15197:2013. Some premium meters publish independent accuracy studies showing performance beyond the minimum standard.
Sample size: If you have difficulty getting adequate blood, look for a meter with a smaller sample volume requirement (some require as little as 0.3 microliters). Smaller sample requirements mean less forceful lancing and less finger trauma.
Display and readability: For seniors or those with visual impairment, large-display meters with high-contrast numbers and backlighting are important practical considerations. Voice-announcement meters are available for those with significant visual impairment.
Connectivity: Many modern meters connect via Bluetooth to smartphone apps that log readings, track trends, calculate averages, and generate reports for healthcare providers. If tracking patterns is a priority, a connected meter simplifies the process significantly.
Strip cost: Over months and years, test strip cost is often the dominant expense in blood glucose monitoring. Consider the cost per strip when evaluating meters, particularly if you test frequently. Some insurance plans cover specific meter brands; check your formulary before purchasing.
Alternate site testing: If fingertip soreness is a significant issue, look for a meter FDA-cleared for alternate site testing (forearm or palm), keeping in mind the timing limitations described above.
Continuous Glucose Monitors (CGMs): When to Consider Upgrading
Continuous glucose monitors (CGMs) use a small sensor inserted under the skin to measure interstitial glucose every 1–5 minutes, transmitting readings to a receiver or smartphone app continuously. CGMs provide a glucose trend graph rather than isolated snapshots, generate alerts for high and low readings, and are increasingly recommended for anyone using insulin or managing diabetes intensively.
Fingerstick meters remain appropriate for: initial diabetes management and learning, periodic spot-checking, situations requiring immediate verification (CGMs may require fingerstick confirmation during rapid glucose changes), and those who test infrequently. Discuss with your healthcare provider whether a CGM is appropriate for your management needs.
Shop Blood Glucose Monitors at AllCare Store
AllCare Store carries a selection of blood glucose monitors, test strips, lancets, and diabetes management supplies. Browse our medicine and monitors collection for available options, or explore our full catalog at allcarestore.com.
- Free Shipping on every order — no minimum required
- Discreet Packaging — all orders arrive in plain, unmarked packaging
- 30-Day Returns — shop with confidence
- Expert Help — reach our team at 1-888-889-6260, Monday–Friday 7 AM–4 PM CST
Frequently Asked Questions: How to Use a Blood Glucose Meter
How do I know if my blood glucose meter is accurate?
The most reliable way to verify your meter's accuracy is to use control solution — a glucose solution at a known concentration, available from your meter's manufacturer. Apply control solution exactly as you would apply blood, and confirm the reading falls within the acceptable range printed on your test strip container. Additionally, bringing your meter to a lab draw and testing simultaneously with your meter while blood is drawn for laboratory analysis allows you to compare results directly. A quality meter should read within 15 mg/dL or 15% of the lab result. If results consistently diverge more than that, check your strips for expiration, ensure proper storage, review your technique, and contact the manufacturer.
Why is my blood sugar reading different depending on which finger I use?
Small variations (5–15 mg/dL) between fingers tested within a minute or two are normal and fall within the expected variability of home meters. Larger differences may indicate: a contaminated finger on one of the readings, inadequate blood flow to one finger (poor circulation, cold hands), or excessive squeezing on one test diluting the sample. If you see consistently large differences, wash all fingers thoroughly, warm your hands, and re-test. Alternate site readings (forearm vs. fingertip) can legitimately differ by more during periods of rapid glucose change, which is why fingertips are preferred for high-stakes testing situations.
Do I need to code my blood glucose meter?
Most modern meters are "no-coding" — they automatically calibrate to each test strip lot using information embedded in the strip itself. A few older meters still require manual coding by entering a number from the strip container into the meter settings. Check your meter's user manual to determine whether your device requires coding. Using an incorrectly coded meter can produce systematic errors across all readings — consistently too high or too low by a fixed amount. If your meter requires coding and you're unsure whether it's been done correctly, refer to the manual or contact the manufacturer's customer service.
What should I do if my blood sugar reading is very high or very low?
Follow the action plan established with your healthcare provider for your specific glucose targets. As general guidance: for readings below 70 mg/dL with symptoms (shakiness, sweating, confusion, rapid heartbeat), follow the 15-15 rule — take 15 grams of fast-acting carbohydrate (glucose tablets, 4 oz juice, regular soda), wait 15 minutes, and re-test. If still below 70, repeat. Once at a safe level, eat a meal or snack. For readings above 240 mg/dL, check for ketones if instructed by your provider, increase water intake, and contact your care team. For any reading that seems inconsistent with how you feel, re-test with a fresh strip after washing hands thoroughly — confirm the reading is real before acting on it.
Can I reuse lancets to save money?
Medical guidelines recommend using lancets once and replacing them. Reused lancets become dull after a single use — the microscopic tip bends on first contact with skin, making subsequent punctures more painful and more likely to cause tissue damage or bruising. Used lancets also carry infection risk from residual blood. That said, many people do reuse lancets in practice, particularly those who test frequently and find the cost of lancets significant. If you do reuse, limit reuse to a maximum of 2–3 times on your own fingers only, and discard immediately at any sign of bending, barbing, or increased pain on insertion.