Note: This article is for informational purposes only and does not replace professional dental advice. Visit your dentist or prosthodontist regularly for denture adjustments, relining, and professional cleanings.
Denture Care: Cleaning and Maintenance Guide for Long-Lasting Comfort
Why Denture Care Matters More Than Most People Realize
Dentures are a significant investment — and a daily essential. Yet surveys consistently show that a large percentage of denture wearers skip key steps in daily care, either because no one clearly explained the routine or because the importance wasn't emphasized after fitting. The result is plaque buildup on the denture surface, bacterial and fungal growth, staining, accelerated material breakdown, and — most importantly — oral health problems that go beyond the dentures themselves.
Even though dentures are artificial teeth, the gum tissue and underlying bone beneath them are still alive and vulnerable. Poorly cleaned dentures introduce bacteria and Candida (yeast) to the gum surface with every wear, raising the risk of denture stomatitis — a chronic inflammation of the tissue under the denture that affects an estimated 50–65% of full-denture wearers to some degree. Bad breath, sore spots, and faster gum recession are additional consequences of inadequate care.
The good news: the right daily routine is straightforward and takes less than 10 minutes total. Browse our complete Oral Care collection at AllCare Store for denture brushes, soaking tablets, adhesives, and all the supplies covered in this guide.
Types of Dentures: Full vs. Partial
Full (complete) dentures replace all teeth in the upper arch, lower arch, or both. They rest on the gum tissue and, in the case of upper dentures, use suction from the palate to stay in place. Full dentures are removed for cleaning and sleeping.
Partial dentures replace one or more missing teeth and are anchored to remaining natural teeth by metal clasps or precision attachments. Partials are also removable and require cleaning both the artificial teeth and the clasps that contact natural teeth.
Implant-supported dentures (overdentures) snap onto or are fixed to dental implants. They may be removable or fixed — your dentist will specify the appropriate cleaning protocol, which differs from conventional removable dentures.
What You Need: Denture Care Supplies
A complete denture care kit requires just a few items:
- Denture brush — a soft-bristled brush specifically designed for dentures. The dual-head design (one large head for surfaces, one small head for clasps and inner areas) is ideal. Never use a regular toothbrush with hard bristles, which can scratch denture surfaces.
- Denture cleanser — a non-abrasive paste or liquid formulated for dentures. Regular toothpaste is too abrasive and will create micro-scratches that harbor bacteria and accelerate staining.
- Denture soaking tablets or solution — effervescent tablets dissolved in water provide overnight deep cleaning and disinfection. Look for products with the ADA Seal of Acceptance.
- A clean basin or cup — for soaking and for rinsing over (lined with a folded towel to cushion a dropped denture).
- Denture adhesive (if used) — for extra retention during the day. Not a substitute for a well-fitting denture.
The Daily Denture Cleaning Routine: Step by Step
Morning: Before Putting In Your Dentures
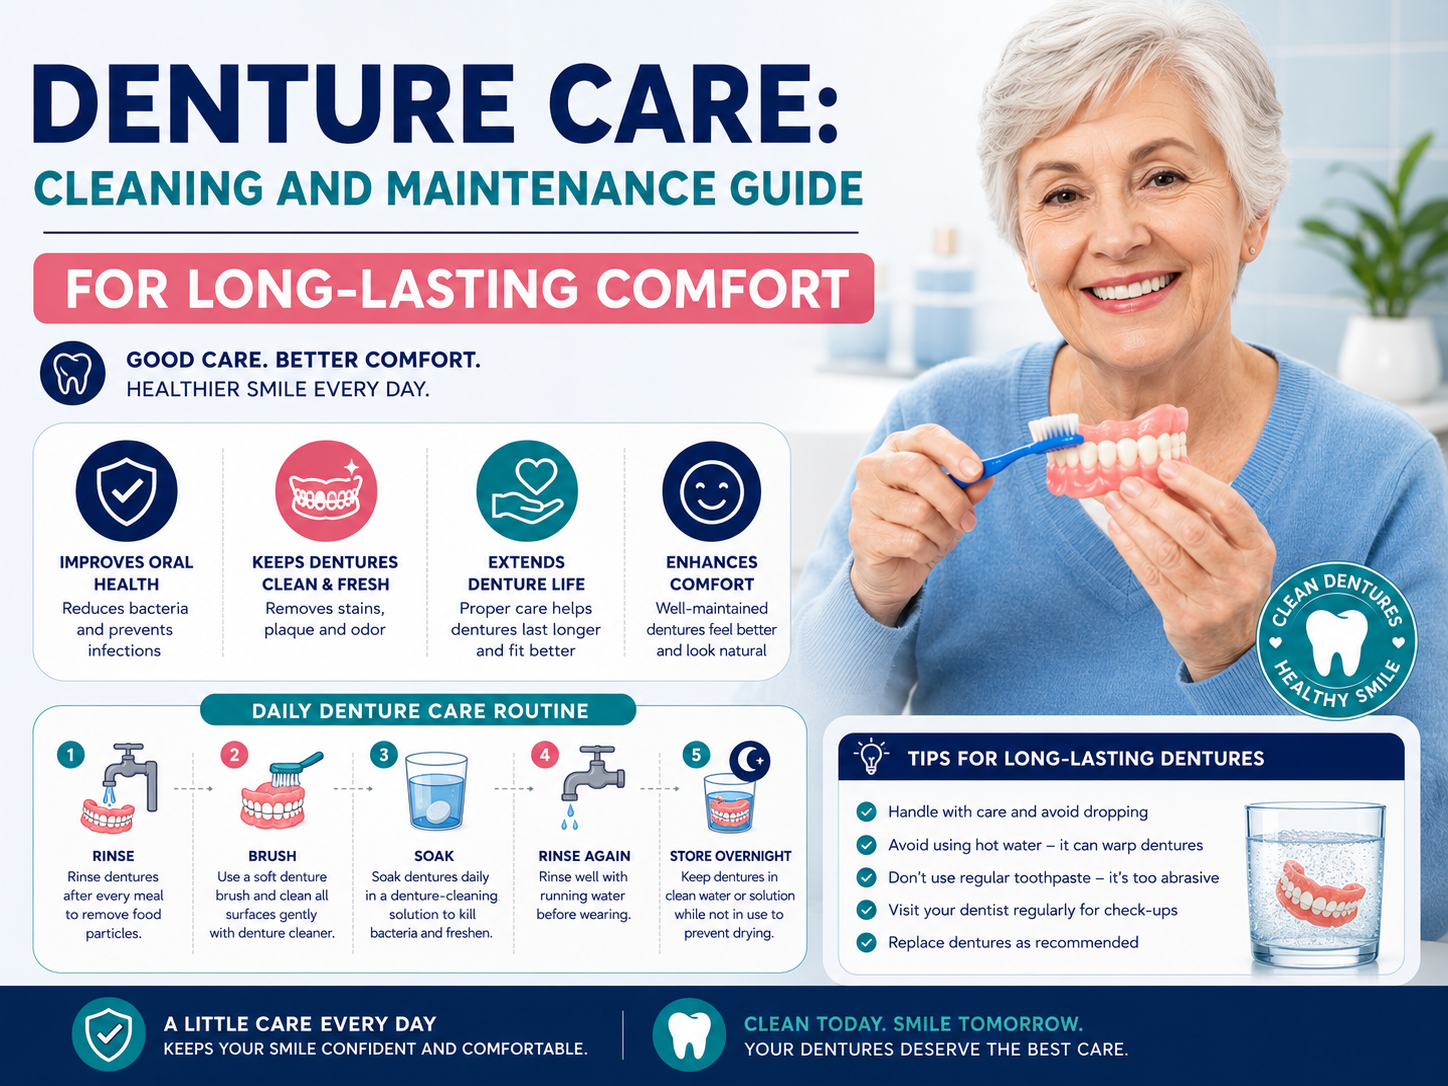
Step 1: Remove from overnight soak. Take the dentures out of their soaking solution and rinse them thoroughly under running water. Soaking solutions are not meant to be swallowed — rinse completely before placing in your mouth.
Step 2: Brush gums and tongue. Before inserting dentures, use a soft regular toothbrush (or a damp washcloth) to gently massage your gums, palate (roof of the mouth), and tongue. This stimulates circulation, removes bacteria that built up overnight, and helps keep gum tissue healthy. This step is frequently skipped — and it's one of the most important for preventing denture stomatitis.
Step 3: Apply adhesive if needed. If you use denture adhesive, apply it to the cleaned denture according to the product directions — typically small dots or strips, not a thick layer. Less is more. A denture that requires large amounts of adhesive to stay in place needs to be refitted by your dentist.
After Every Meal: Rinse
Remove dentures after meals when possible and rinse them under running water to remove loose food particles. If removal is not practical (at work, in public), at minimum rinse your mouth with water after eating to flush food from under the denture. Food trapped beneath dentures causes sore spots and creates an environment for bacterial growth.
Evening: The Full Cleaning Routine
Step 1: Remove and rinse. Remove dentures and rinse them under running water to remove loose debris before brushing.
Step 2: Brush all surfaces. Hold the denture over a basin lined with a folded towel or half-filled with water (a dropped denture can crack on a hard sink). Using a denture brush and non-abrasive denture cleanser, brush all surfaces: the outside (cheek-facing side), inside (tongue-facing side), the chewing surfaces, and — for partial dentures — the clasps and connector areas carefully. Use gentle circular strokes. Rinse thoroughly after brushing.
Step 3: Soak overnight. Place dentures in fresh soaking solution (a denture soaking tablet dissolved in the appropriate amount of water, usually lukewarm — not hot). Soak for the recommended time, typically overnight. Overnight soaking loosens stain and tartar deposits that brushing alone cannot fully remove, and the effervescent action and cleaning agents reduce bacteria and yeast on the denture surface.
Step 4: Clean your mouth before sleeping. After removing dentures for the night, brush your gums, tongue, and palate with a soft toothbrush. If you have remaining natural teeth, brush and floss them thoroughly. Allowing gum tissue to rest without the denture overnight improves tissue health significantly.
Water Temperature: An Important Detail Many People Miss
Never use hot or boiling water to clean or soak dentures. Most dentures are made of acrylic resin (sometimes with a metal framework for partial dentures). Hot water can warp the acrylic, causing the denture to fit differently — sometimes permanently. This is a common and easily preventable error. Use cool or lukewarm water for rinsing and soaking at all times.
What to Avoid in Denture Care
| What to Avoid | Why |
|---|---|
| Regular toothpaste | Too abrasive — scratches acrylic and creates grooves that trap bacteria and stain faster |
| Hard-bristle brushes | Same reason — scratches the surface; always use a soft-bristle denture brush |
| Bleach or household cleaners | Can whiten and weaken the pink gum-colored acrylic; bleach also corrodes metal clasps on partial dentures |
| Hot water | Warps acrylic — can permanently change the fit of the denture |
| Letting dentures dry out | Dry acrylic becomes brittle and can crack; always keep dentures moist when not in the mouth |
| Ultrasonic cleaners (some types) | Not all ultrasonic cleaners are safe for dentures — check with your dentist before using |
| DIY denture repair kits for major breaks | Minor cracks only; a properly fitted repaired denture requires professional lab work — DIY repairs often worsen fit and can damage remaining natural teeth (for partials) |
Handling and Storing Dentures Safely
Dropping is the most common cause of denture damage. Always handle dentures over a folded towel on the counter or over a basin of water. A fall onto a hard floor or sink from counter height can crack or chip acrylic dentures, and repairs are costly. The habit of preparing a soft landing takes seconds to establish and can save hundreds of dollars.
Storage when not wearing: Keep dentures in a denture soaking solution or plain water when not in your mouth. Never leave them dry. If traveling, a sealed denture container with soaking solution prevents drying and protects against dropping.
Keep dentures away from children and pets. Dogs in particular are drawn to the scent of dentures and a chewed denture is a significant dental expense.
Denture Adhesive: When and How to Use It
Denture adhesive helps improve the fit and comfort of well-fitting dentures, particularly for lower dentures (which have less natural suction than upper dentures). Key points:
Adhesive is a comfort supplement, not a fix for a poorly fitting denture. If your dentures rock, slip significantly, or require large amounts of adhesive to function, they need to be relined or replaced — not secured with more adhesive. Wearing an ill-fitting denture causes progressive bone resorption that makes future fitting more difficult.
How to apply: Apply small dots or strips to the clean, dry denture surface (not to wet dentures — the adhesive will not adhere properly). Use the minimum amount needed. After eating, remove any residual adhesive from your gums and the denture before reapplying.
Zinc-free formulas: Some older denture adhesive products contained zinc, and excessive long-term use was linked to copper deficiency. Most modern products are zinc-free — check the label and choose zinc-free formulas.
Warning Signs That Your Dentures Need Professional Attention
Regular use changes the fit of dentures over time as the underlying bone and gum tissue naturally resorb (shrink) after tooth loss. Dentures typically need relining or adjustment every 1–2 years and replacement approximately every 5–7 years. See your dentist promptly if you notice:
- Persistent sore spots or irritation that don't resolve within a few days
- Increased rocking or looseness — especially if it develops gradually
- Difficulty chewing foods you could previously manage
- Changes in your bite (how upper and lower teeth meet)
- Visible cracks, chips, or a broken clasp on a partial
- Red, inflamed tissue under the denture (may indicate denture stomatitis)
- White patches or persistent soreness (warrant professional evaluation)
Special Care for Partial Dentures
Partial dentures include metal clasps that grip remaining natural teeth. These areas require extra attention:
- Brush clasps carefully with the small-head side of the denture brush to remove plaque buildup where the clasp contacts the natural tooth. Plaque at these contact points is the primary cause of cavity development on the teeth that anchor partial dentures.
- Soak partials in a solution specifically labeled safe for metal components — some effervescent tablets can corrode certain metals over time. Check the product label.
- Continue brushing and flossing all remaining natural teeth twice daily. The health of your natural teeth directly determines how long a partial denture will function properly.
Shop Denture Care Supplies at AllCare Store
AllCare Store carries a full range of oral care products including denture brushes, soaking tablets, non-abrasive denture cleansers, and adhesives. Browse our Oral Care collection or visit allcarestore.com to shop the complete selection.
- Free Shipping on every order — no minimum required
- Discreet Packaging — all orders ship in plain, unmarked boxes
- 30-Day Returns — shop with complete confidence
- Expert Help — call us at 1-888-889-6260, Monday–Friday 7 AM–4 PM CST
Frequently Asked Questions: Denture Care and Cleaning
How often should I clean my dentures?
Dentures should be rinsed after every meal and brushed thoroughly at least once daily — most dentists recommend a complete brushing and overnight soak every evening. Plaque builds up on dentures just as it does on natural teeth, and bacteria and yeast that accumulate on unclean dentures are re-introduced to your gum tissue every time you wear them. Daily brushing combined with overnight soaking provides the most complete clean.
Can I use regular toothpaste to clean my dentures?
No. Regular toothpaste contains mild abrasives designed to clean natural tooth enamel, but these abrasives are too harsh for the acrylic resin that most dentures are made from. Over time, regular toothpaste creates microscopic scratches on the denture surface that trap bacteria, accelerate staining, and dull the finish. Always use a non-abrasive cleanser specifically formulated for dentures.
Should I sleep with my dentures in or out?
Most dentists recommend removing dentures at night. Removing dentures allows the gum tissue and underlying bone to rest and recover from the pressure and friction of wearing a prosthesis all day. It also allows for thorough overnight soaking that reduces bacteria and yeast levels on the denture surface. Some patients have specific reasons their dentist may recommend overnight wear — follow your dentist's individual recommendation if it differs from the general guidance.
What is the best way to soak dentures overnight?
The most effective overnight soak uses a commercially prepared effervescent denture soaking tablet dissolved in the recommended amount of cool or lukewarm water — never hot water, which can warp acrylic. Soak for the time specified on the product label (most are designed for overnight soaking of 6–8 hours). In the morning, rinse the dentures thoroughly before placing them in your mouth — soaking solution is not meant to be swallowed. Plain water is an acceptable soak to keep dentures from drying out if soaking tablets are not available, but it does not disinfect.
How long do dentures typically last?
Well-maintained dentures typically last 5–7 years before replacement is recommended. Even with perfect care, the natural resorption (shrinking) of the jawbone after tooth loss changes the fit of dentures over time. Dentures that fit poorly cause accelerated bone loss, sore spots, and difficulty chewing — all of which are best addressed with professional relining or replacement rather than more adhesive. Annual checkups with your dentist allow fit problems to be caught and corrected early, extending comfort and function.